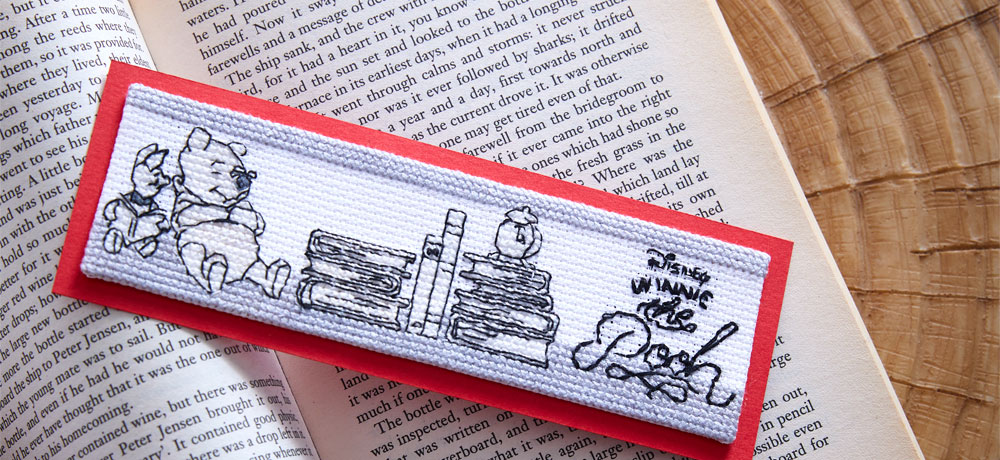
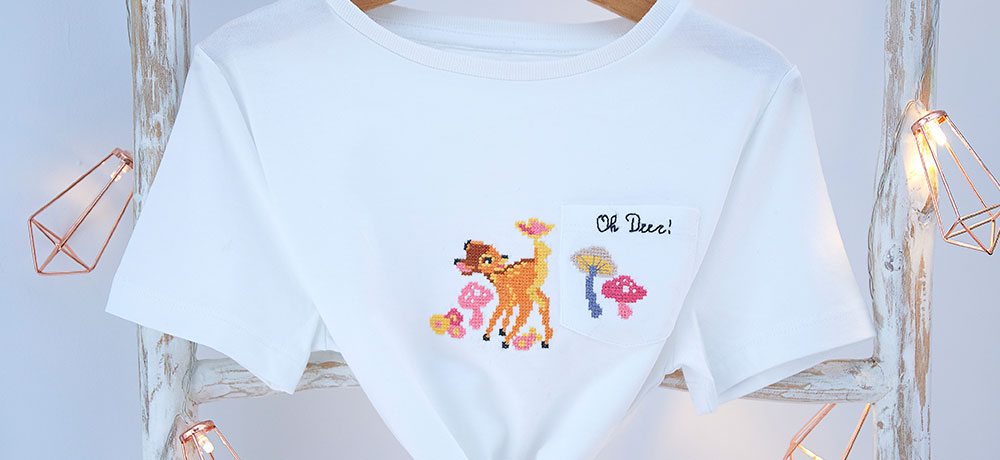
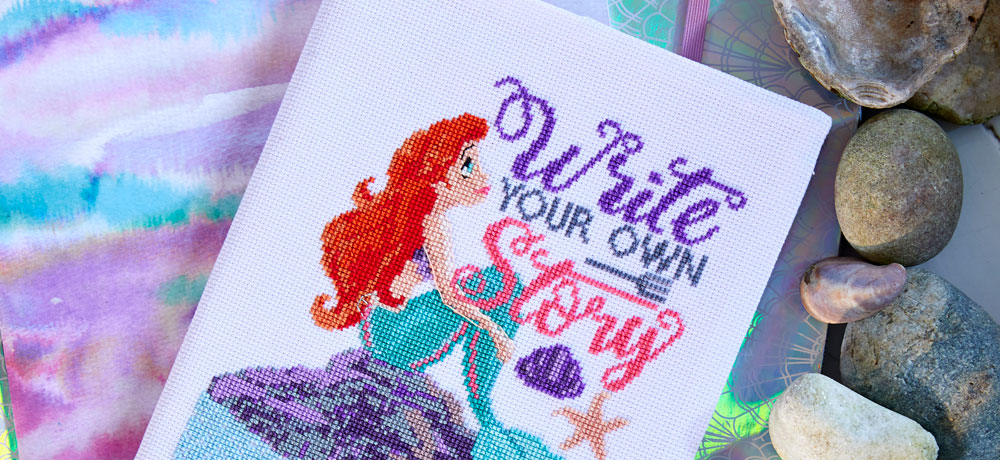
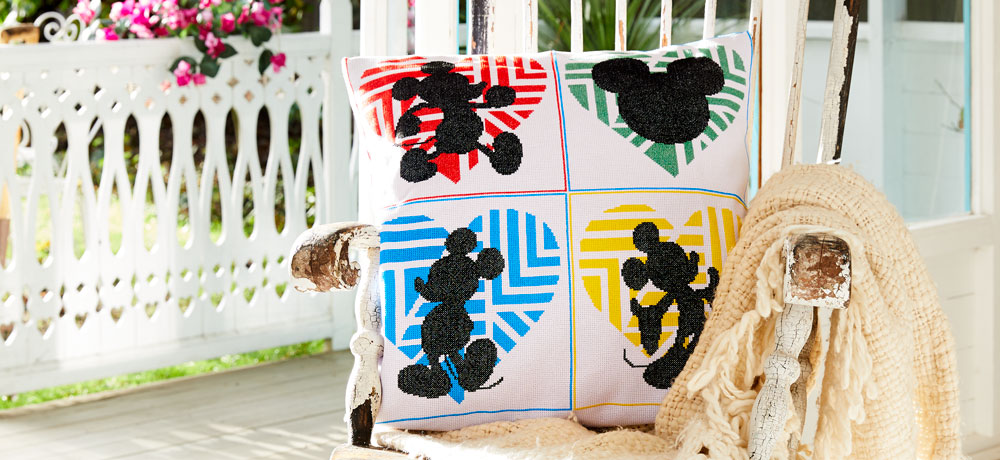
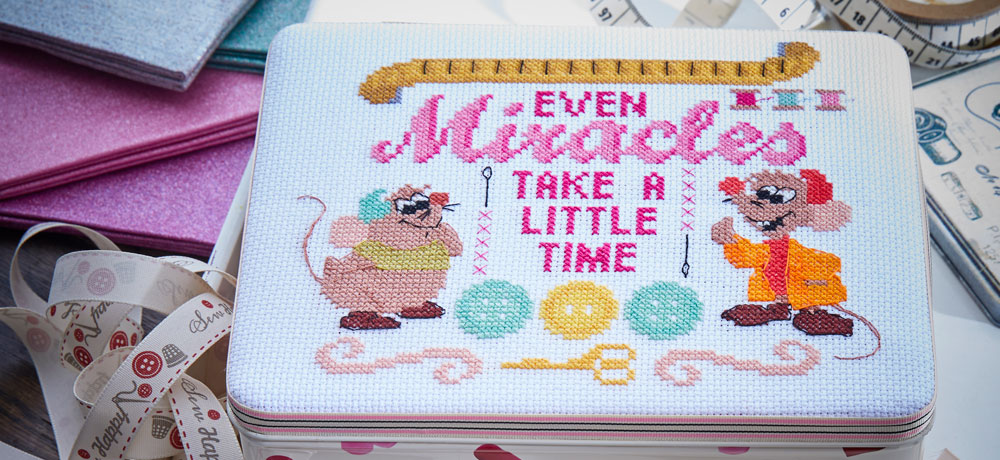
Your Template Library
Find the instructions, templates, hints and extra ideas for all of the creative makes in your Disney Cross Stitch magazine collection.


You will need
Your finished piece of stitching
Mid-weight card
Double-sided sticky tape
Paper glue/sticky tape
Needle and thread in a matching colour
Scissors
Tape Measure
Fabric/felt/coloured card
- Take your finished design for one side and on the back of the fabric mark out a rectangle shape around your stitching. Cut out the rectangle, leaving an additional 1.5cm seam allowance on each edge. Repeat for each side.
- Cut four pieces of medium-weight card (one for each side of the box), each measuring the same size as your stitched design. Attach a piece of card to the reverse of each design using double-sided tape. Press the excess fabric border back to the reverse of the card and secure with double-sided tape. Ensure the design is positioned centrally and that the edges are straight, smooth and taut (but don’t overstretch).
- Decide how you would like the pattern to run around the box, then take your first two sides and ladder stitch them together down one long edge. Add the third and fourth sides in the same way, then finally connect the fourth and first sides.
- Cut a piece of card to fit the bottom of the box. You could use coloured card, or cover it in fabric or felt. Place it in position and attach using either fabric glue or small stitches in matching sewing thread.
- To make the lid, trace around the base of your box onto a piece of medium-weight coloured card. Add tabs on each side of the square as shown in the illustration. Cut out the finished shape, then lightly score along the black lines and gently fold your cardboard back to create the sides of the lid. Fix the tabs in place using strong craft glue.

You will need
Your finished piece of stitching
Backing fabric/lining fabric
Wadding/batting
12cm ribbon
Sewing kit/sewing machine
Template
- Print and cut out the provided template at 100% and place it on the reverse of your finished stitching, making sure that the design is centralised. Using a pencil, trace around the template onto the reverse of the fabric, then cut it out, allowing an additional 1.5cm seam allowance all around.
- Repeat the above process three more times on your backing/lining fabric to create one backing piece and two lining pieces.
- Use the template to cut two dome shapes from the wadding. You won’t need to add a seam allowance for these – instead, trim each wadding piece by approximately 12mm on each side and around the curve. This is to make it smaller so that it sits comfortably inside the lining.
- Turn up (to the wrong side) a 1.5cm hem along the long straight edge of each of the four fabric pieces. Press in place using an iron.
- Place the two outer pieces of the tea cosy together – right sides facing – and pin in place. Take your length of ribbon, fold it in half and position it centrally at the top of the dome. Insert it between the two layers so that the loop faces in and the ends protrude into the seam allowance, then pin in place. Using your original pencil line as a guide, stitch the outer pieces together using the 1.5cm seam allowance. Take care to leave the long bottom edge open. Then stitch the lining pieces together in the same way.
- Carefully snip notches around the curves of the domes. Turn the outer cosy right side out, but leave the lining wrong sides out.
- Place the lining inside the outer cosy, matching up your side seams – wiggle it into place to ensure a good fit. Then take a piece of your wadding and insert it between the lining and the outer cosy. Repeat for the other side and manipulate into place to get a good fit.
- To finish, match the bottom folded edge of the lining to the bottom folded edge of the outer cosy, then pin and stitch together.
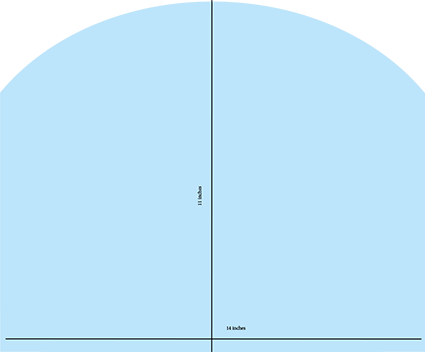
You can alter the template of the tea cosy to match your teapot. Simply measure the height of your teapot and add 3cm.
You will need
Your finished design
Child safe polyester stuffing
Sewing kit/sewing machine
- On the reverse of your stitched piece, mark out a 1cm border around each design, plus an additional 1.5cm seam allowance. Cut out your designs so that you have six pieces. Tip – the cube has precise corners that need to fit together, so make sure all your sides are exactly the same size before you start stitching.
- Decide how you would like your finished designs to sit together, then lay them out in the following way:
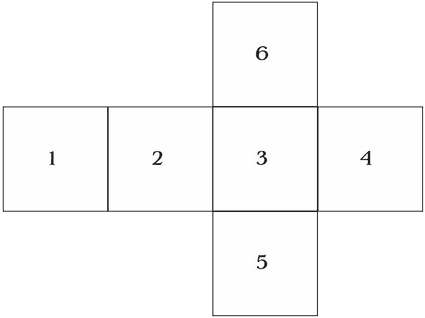
- Following the numerical sequence, begin stitching your designs together. To start, pin sides 1 and 2 together (right sides facing), taking care to ensure the edges are fully aligned. Stitch the pieces together along the one edge as shown, using a 1.5 seam allowance. Then repeat until you have attached all six sides and your piece looks like the diagram.
- The next part is trickier as it involves making the cube 3D, but it follows the same process as in Step 3. Continue sewing the edges together to form the cube – you will need to attach one edge of piece 2 to piece 6 and one edge to piece 5, then attach one edge of piece 4 to piece 5 and one edge to piece 6. Finally, attach one edge of piece 1 to piece 6 and another edge to piece 5. Leave the final edge of piece 1 open for now.
- Very carefully snip across the corners, then turn the cube right side out through the one remaining open seam. Push out the corners.
- Fill the cube with stuffing as required, then close the open seam with slip stitch.
You will need
Your finished piece of stitching
Small piece of backing fabric to fit your mask
Thin elastic in the length required for fit
Wadding/batting
Sewing machine/Sewing Kit
Scissors
Template
Pencil
Tape measure
- Trace around the template onto the back of your finished piece of stitching, ensuring the design is centred. Cut out, leaving an additional 1cm seam allowance all around. Then cut a piece of backing fabric to the same size.
- Use the template to cut out a piece of wadding (do not add seam allowance). Then trim the wadding by 5mm all around so it will fit comfortably inside the mask.
- Lay the front of the mask on top of the backing fabric, right sides together, then place these on top of the wadding and pin all three layers together.
- Measure halfway down at each end of the mask and insert your piece of elastic at these points. Place the elastic between the front and back pieces of fabric, so that it’s contained inside the mask with just the ends poking out through the seam allowance at the halfway points.
- Sew all around the mask using a 1cm seam allowance and leaving a small gap for turning through. Stitch across the elastic several times to fasten in place, but take care not to catch the main bulk of the elastic as you sew the layers together.
- Cut small notches all around the curved edges of the mask, then carefully turn right sides out – the wadding should now be inside the mask.

You will need
50 x 50cm velvet
50 x 50cm coordinating lining fabric
Hemline 125mm Sew-in Bag Clasp frame
PDF template
Scissors
Sewing machine/sewing kit
Strong clear nylon thread
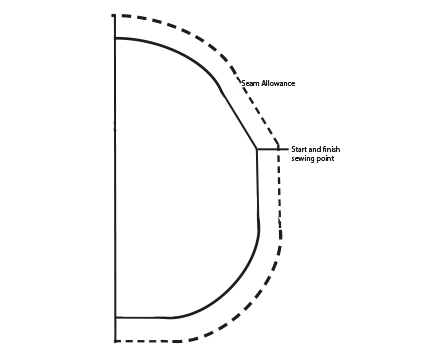
- Fold your piece of velvet in half (right sides together). Print out the attached template at 100%, cut it out and place the straight edge along the folded edge of your velvet and pin in place, then cut out, taking care to mark or notch the start/finish point in the seam allowance where shown. Cut out one more velvet piece in the same way, then two pieces from your lining fabric.
- Stitch your design centrally onto one piece of the velvet.
- Once you have stitched your design, place the two velvet pieces right sides together. Pin and stitch together along the seam allowance, taking care to start and finish at the marked points. Tip - you are only stitching the lower half of the purse together as the upper parts need to remain separate to form the purse opening.
- Repeat Step 3 using your lining fabric. Next, snip small notches into the seam allowance around the curved edge of both pouches. Turn the velvet pouch right sides out, then place the lining pouch inside, lining up the side seams. Push the lining down into place and align the top raw edges of the lining and the velvet. Press back the seam allowance of both pieces, then pin the lining and velvet top edges together and close using slip stitch. Repeat for the other side.
- Open your clasp frame and insert one top edge of the purse into the frame. This can be quite fiddly so it can be helpful to pin the purse in place. The corners of the frame should align with the starting/finishing points you previously marked on your fabric - sometimes it’s necessary to ease the fabric around a bit to create an exact fit. Start in the centre at the top and hand sew the purse into the frame using the nylon thread. Pass the needle through the pre-made holes from front to back - making sure to sew through the fabric as you go. Once you have attached one side of the frame, repeat for the other side.
There are other brands and types of clasp frame available - some are stitch-in, some are glue-in. You can use any clasp frame you choose, but please read the manufacturer’s instructions before use as you may have to make your own pattern template to fit the size, shape and attachment of the frame. The template supplied should work with the clasp listed above.
Clasp frames can be tricky if you have never made one before. It can be helpful to make a ‘dummy’ purse first to check the technique and ensure that you’re happy with the shape before you start cutting your stitched design!
You will need
Your finished design
1m x 50cm coordinating fabric
A4 sheet of felt
1 metre medium weight fusible interfacing
Thick card (optional)
Scissors
Self adhesive hook and loop tape
Sewing kit/sewing machine
- On the reverse of your stitched piece, mark out a 1cm border around the design, plus an additional 1.5cm seam allowance. Cut out your design, then use it to make four identical squares from your coordinating fabric and one square from your felt. Tip – the cube has precise corners that need to fit together, so make sure all your sides are exactly the same size before you start stitching.
- Using an iron, attach the fusible interfacing to each of the squares of fabric and felt. Take extra care and use a very low heat when attaching it to the felt as not all felt is heat-resistant and it can burn or warp.
- To make the lid of the money box, take your felt square and fold it in half. Mark a point halfway along the folded edge, then, using sharp scissors, make a clean 2cm cut towards the opposite long edge. Unfold the felt and you should be left with a slot.
- Lay out your six pieces following the diagram below. Piece 1 should be the stitched design and piece 2 the felt lid:
- Following the numerical sequence, begin stitching the pieces together. To start, pin sides 1 and 2 together (right sides facing), taking care to ensure the edges are fully aligned. Stitch the pieces together along the one edge as shown, using a 1.5 seam allowance. Then repeat until you have attached all six sides and your piece looks like the diagram.
- The next part is trickier as it involves making the cube 3D, but it follows the same process as in Step 3. Continue sewing the edges together to form the cube – but leave one edge at the back of the cube open. This will be for turning through and will also make the opening of the money box.
- Very carefully snip across the corners, then turn the cube right sides out through the one remaining open seam. Push out the corners.
- To create the opening for the money box, press back the raw edges of each side of the open seam to create a neat edge - the pressed back seam allowance will create a ‘flap’. Apply self adhesive hook and loop tape along each flap and press together. It can be easily pulled apart to access the contents.
For extra stability, you can insert a square of rigid card into the base and sides of the cube.
You will need
Your finished design
Mini bunting PDF template
1/2 metre or fat quarters of coordinating fabric of choice
2.5cm width bias binding in colour and length of choice
Sewing kit (tape measure, pins, cotton, needles or sewing machine)
Pencil
Scissors
- Print out the mini bunting template at 100% and cut out.
- Position the template centrally on the back of your stitched design (front panel). Check that you’re happy with the positioning of the design, then draw around the template. Cut out, leaving an additional 1.5cm seam allowance all around. Use your cut out fabric to make a matching back panel from coordinating fabric. Repeat as necessary to make as many flags as required.
- Place the front panel on top of the back panel, right sides together, then pin and stitch in place, making sure to leave the top straight edge open.
- Carefully cut across the points of the flag, then turn right side out. Fully poke out the tails of the flag, then press. Repeat for the other flags.
- Cut a length of bias binding to the required length, then fold in half lengthways and press. Insert the raw top edge of the flag into the crease in the binding and pin in place. Repeat for the other flags, spacing as required, then top stitch in place along the length of the bias binding.

You will need
Your finished design
Two A4 pieces of lightweight glitter card/paper in contrasting colours
Double-sided tape
One regular card blank
Sewing kit
(tape measure, pins, cotton, needles or sewing machine)
Scissors
Craft scalpel (optional)
Glue (optional)
- Measure the height and width of your finished stitched design, then add an additional 2cm to both the height and the width (to allow for a 1cm border all around).
- Using the measurements from Step 1, mark out a square or rectangle centrally on the reverse of one piece of glitter card. This will be the aperture for your card.
- Mark out a second square around your aperture, leaving 1.5cm around the bottom and both side edges and 4cm on the top edge. Cut out the inner square first to make your aperture using scissors or a craft scalpel, then cut out the second square to make the card front. Apply double-sided tape around the aperture on the reverse of the card, then carefully position over your stitched design and press down firmly into place. Trim the aida as necessary.
- Take your regular card blank and attach the framed piece to the front of it using double-sided tape.
- Use the template below to make a paper bow from your contrasting paper/card. Trace around it onto your paper/card and cut out the shape. Carefully curl the right flap up and into the centre, securing with glue or double-sided tape. Then repeat for the left flap. Add a sequin, button or another embellishment to disguise the join in the centre, then glue or tape in place along the centre top of your card.

You will need
Your finished design
Two A4 pieces of lightweight card
Double-sided tape
Scissors, pencil and ruler
Craft scalpel (optional)
Glue (optional)
PDF template below
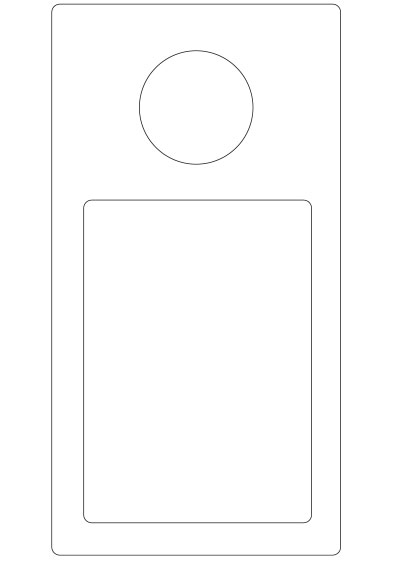
- Print out the template at 100%, cut out the door hanger, then cut out the rectangular and circular windows. Trace the template onto your two pieces of card - for the front piece, include both the rectangular and circular windows and for the back piece, just trace the overall outline and the circular window - then cut both pieces out.
- On the wrong side of the front piece, place double-sided tape around the rectangular window, then around the inner edges of the hanger. Remove the backing tape from around the rectangular window, then position over your design and once happy with the positioning, press firmly in place. Trim any excess aida so there is no overlap.
- Remove the backing tape from around the edges of the front piece, then attach the back piece - taking care to line up the circular windows and pressing firmly in place all around.
You will need
Your finished design
One piece A4 card in design/colour of your choice
Self-adhesive craft magnet
Double-sided tape
Scissors, pencil and ruler
PDF template below
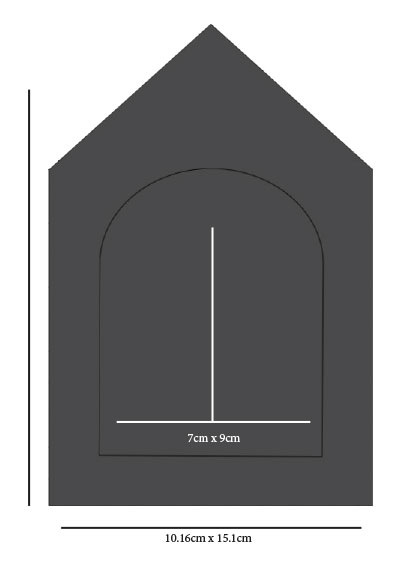
- Copy the template at 100% and cut out.
- Carefully cut out the inner arch.
- Trace around the template twice onto your thin card. For one outline, don’t include the inner arch – this will be the back piece of your doghouse.
- Take the front piece of your doghouse and position the arch opening over your stitched design. Once happy with the positioning, draw around the outline of the front piece onto your fabric. Cut your fabric out, about 1cm in from the outline you drew (this is to ensure the fabric doesn’t overhang).
- Fix the front of your doghouse to your fabric using double-sided tape, then attach the back of the doghouse to the reverse of your fabric.
- Finally, attach a self-adhesive magnet to the back of your doghouse.
You will need
Your finished designs
Patterned contrasting fabric for panels
Toy safe polyester stuffing
Scissors, pencil and ruler
Sewing kit/sewing machine
Pdf pattern (below)
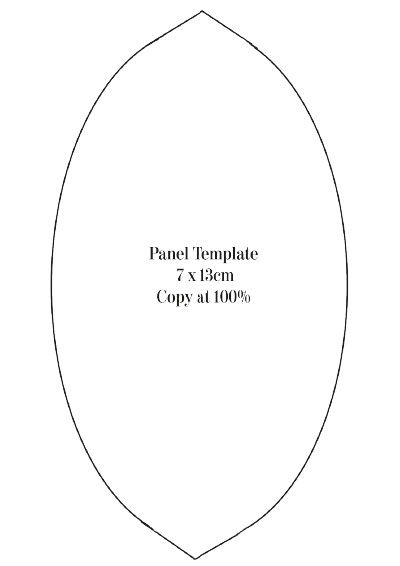
- Print the pdf template at full size - or resize as required to make the ball larger or smaller - and cut out.
- Place the panel template over the back of your stitched design, ensuring that the design is central. Trace around the template onto your aida, then check that you’re happy with the position of your design within the panel. If so, add an additional 1.5cm seam allowance all around your traced panel and cut out.
- Using your cut aida panel as a template, repeat step 2 for your other stitched designs. Then cut three panels from your contrasting fabric. To make the ball, you will need six panels in total - so if you have three stitched panels, you will need 3 contrasting fabric panels to alternate - but you can vary the combination however you like.
- Decide how you want your ball to look and then lay out the panels in the correct running order, 1-6. Starting with panels 1 and 2, take two panels at a time, place them together right sides facing, pin in place and stitch them together along one curved edge. Repeat for panels 3 and 4, then 5 and 6. You should end up with three pairs of joined panels. Trim the seam allowance slightly on each pair.
Tip - if you have a directional pattern on your contrasting fabric, make sure it’s the same way up as your stitched design when you place the panels together. - Following your panel running order from step 3, take your first two pairs of panels and place one side from each pair rights sides facing. Pin in place and then join by stitching along one curved edge. You should now have 4 joined panels. Trim the seam allowance slightly again, then repeat the process and join the last pair of panels, so that all six panels are joined.
Tip - Once again, check that all your patterns are the same way up as you join the panels. - Join your first and last panels together in the same way, by placing them together, right sides facing, and stitching along the curved edge. However, this time, leave approx a 4cm gap in the seam for stuffing. Trim any remaining seam allowance excess.
- Turn your ball right sides out, then stuff firmly and slip stitch the gap closed.
If the top and bottom points of where your panels meet are a bit messy, you can cover them by adding a small decorative circle of fabric or felt!